Having recently taken on a B36 2003 boat, I was less than happy with the windlass and wiring situation.
Why do this?In the main, the switch and breaker were a combined unit, situated in the chain locker and unprotected from the elements. No solenoid was in the circuit and a huge unprotected run of non-tinned (what looked like AC home type) cable running back to the house battery. The windlass was supported on a chunk of 20mm plywood bolted to the windlass shelf which had itself been cut out and left unprotected with the resultant rot of the plywood core, the shelf itself starting to split at the forward end.
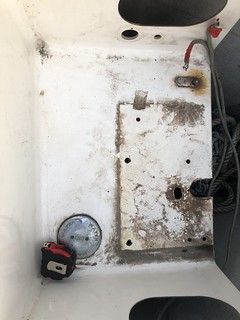
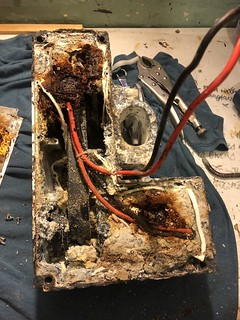
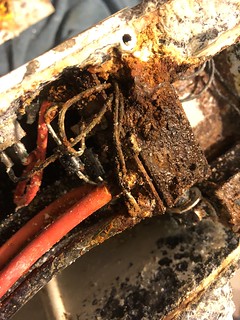
The net result was the windlass was inoperable, rusted away and full of salt crystals - the switch had been destroyed and nothing was in the way of a serious short between the front end and the batteries.
It all had to go..
The refit - part one, deciding how to do this.Several things needed to be achieved, and some were always going to be a stopgap until the next haulout (or nice weather), but the job needed to be done right - rather than bodged. And I wasn't ever paying anyone else to do this...
- Rip out everything connected to the windlass.
- Decide which windlass to purchase.
- Make sure I have the correct wiring in place.
- Repair the windlass shelf.
- Create a waterproof solution for the solenoid and remote box.
- Fit a proper breaker.
Rip it all out.Once I had worked out that the way to get the cabling out was to go inside the cupboards along the side of the boat, removing the small slats at the top and back which exposed the cabling, it all got a bit easier. The cabling itself was pretty much solid - almost rigid so this was a terrible job, requiring me to cut the cable in several places to de-thread it. Some of the screws holding the cupboard sats in place were corroded which meant more frustration - I mean come on Bavaria, it's a bloody expensive boat - do a few cheap ss self-tappers really cost so much more?
Removing the windlass and shelf that it sat on was easy, the unprotected plywood shelf crumbled in my hands leaving some bolts to be cut away and exposing the true issue of the non protected windlass shelf underneath. I then removed the old corroded switchgear from the port side of the shelf area and cleaned everything up as best I could.
Which windlass?Thanks to a discussion on here and a bit of Googling, I was able to find a Quick 2000 (
http://www.quicknauticalequipment.com/en/products/windlasses-and-capstans/horizontal-on-deck-windlasses/genius-gp2/) at last years price, this was equipped with an 8mm gipsy and freefall clutch and came with the solenoid I needed. For me it's suited to our purposes - I appreciate that it's not as tough as the more well-known ones, but for our intended cruising style - perfect. It also has an integrated chain counter which I can play with later and make up an Arduino project for.
 The correct wiring
I asked on the YBW forum about the correct wiring for the windlass, minds greater than mine have already done this so many times it seems a no-brainer to use the excellent resources available.
Be advised, there was some pretty impressive thread drift by the end of the topic!
http://www.ybw.com/forums/showthread.php?508308-Windlass-Wiring-Checking-for-Safety&p=6563798&highlight=#post6563798I purchased 2 x 10m reels of 25mm 170 amp tinned flexi cable from eBay :
https://www.ebay.co.uk/itm/25mm-sq-Automotive-Marine-Tinned-Battery-Cable-170-Amp-Black-Red-All-Lengths/221446554495?ssPageName=STRK%3AMEBIDX%3AIT&var=520317710351&_trksid=p2057872.m2749.l2649.
Plus proper terminals for both 6mm and 8mm bolts - and just for the purposes of completeness, I already had one of these hydraulic crimpers - also from eBay - and worth its weight in gold in my opinion.
 https://www.ebay.co.uk/p/10-Ton-Hydraulic-Crimper-Crimping-Tool-Wire-Battery-Cable-Lug-Terminal-9-Die-VAT/1375226585?iid=322502047411&chn=ps
The 25mm cable was threaded forward and after taking the white boards away from the front of the forward cabin, exposed the back of the chain locker and windlass shelf, this is a really easy thing to do - the technique to remove the boards seems to be to slightly push them upwards and then rotate them enough to be able to slide them out, they are held in place with self tappers into plywood.
At this point, I was able to determine my path to the windlass, and the positioning point of the solenoid box, remote and master switch cabling.
Repairing the windlass shelfClearly, in order to have a sustainable solution, some grp work was needed. I cleaned up the existing holes and went to work with a Dremel - cleaning the rotting inner core plywood out as best I could, I over drilled the other numerous holes and cleaned them out too, I then used the supplied template for the windlass and drilled the new mounting holes. At this point it got interesting...
The windlass shelf is a wee bit short for the windlass mounting bolts to cleanly go either in front or behind the chain locker rear wall - which in a cruel twist of fate, is not the same depth as the shelf above. This required some lateral thinking.
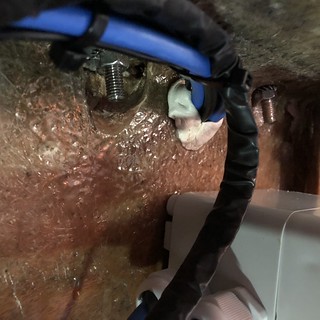
My solution was to drill the holes as far back as was possible, but retaining the drop for the chain, and then boring access holes vertically in the plywood wall making some recesses to allow me to get the nuts on to the threaded rods for the windlass. I have retained the integrity of the chain locker wall but it's very close. You can see the end result in the image below.
Once the measuring (and re-measuring) was done, the holes all drilled oversize and then all of them countersunk, I placed a chunk of plastic which had been covered in peel ply under the shelf and clamped it in place, a quick clean up with acteone, then I mixed up some West Systems epoxy and 403 additive into a peanut butter like consistency and piped them into the holes, credit for this technique must go to Mads on the Sail Life channel on YouTube, if you haven't seen his refit videos - go now and view them.
That left the big holes to fill. This required me to make up another backing plate to enable me to remake the shelf front and gaffer tape it in place with again peel ply facing in. I mixed up some neat epoxy and coated all the surfaces, then laid down 3 layers of 400gsm chop strand matting interspersed with 3 layers of bi-axial 400gsm cloth and wetted it all out - this making the base of the shelf and tying it into the existing shelf.
Once done, I then made up more epoxy and added lots of cut strands of glass to make up a really stiff (but resin rich) gloopy mass which then filled the cavity left over, I repaired in a similar fashion the drop hole for the chain and added extra glass to the edges of the new drop hole to provide some protection.
The following day, I ripped off the peel ply and sanded away the excess epoxy, leaving a nice and strong shelf once again - all had been tied back together in the process. I then redrilled only the holes I needed - this time at the proper size - and proceeded to fit the windlass into place. It's worth mentioning that I also coated the inner parts of the anchor locker bulkhead with neat epoxy as well, this to protect the internal areas more than anything, can never be too careful with water ingress.
Making the solenoid waterproof.The box I have used to 'pot' the solenoid and remote is this one :
https://www.amazon.co.uk/gp/product/B06XDK3GFT/ref=oh_aui_detailpage_o01_s00?ie=UTF8&psc=1 and is just big enough (with a little shaving of the solenoid mounting bracket) to fit everything in. I have added some glands too :
https://www.amazon.co.uk/gp/product/B01IB0E0R4/ref=oh_aui_detailpage_o02_s00?ie=UTF8&psc=1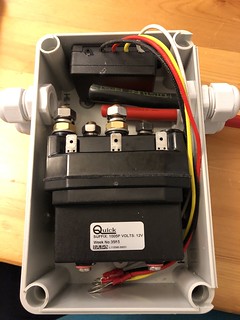
I have purchased a remote kit from WinchIt (eBay again!) which looks like this:
https://www.ebay.co.uk/itm/DIGITAL-2-4G-WIRELESS-WINCH-REMOTE-CONTROL-TWO-HANDSET-12-24-volt-WARRIOR/281455855957?ssPageName=STRK%3AMEBIDX%3AIT&_trksid=p2057872.m2749.l2649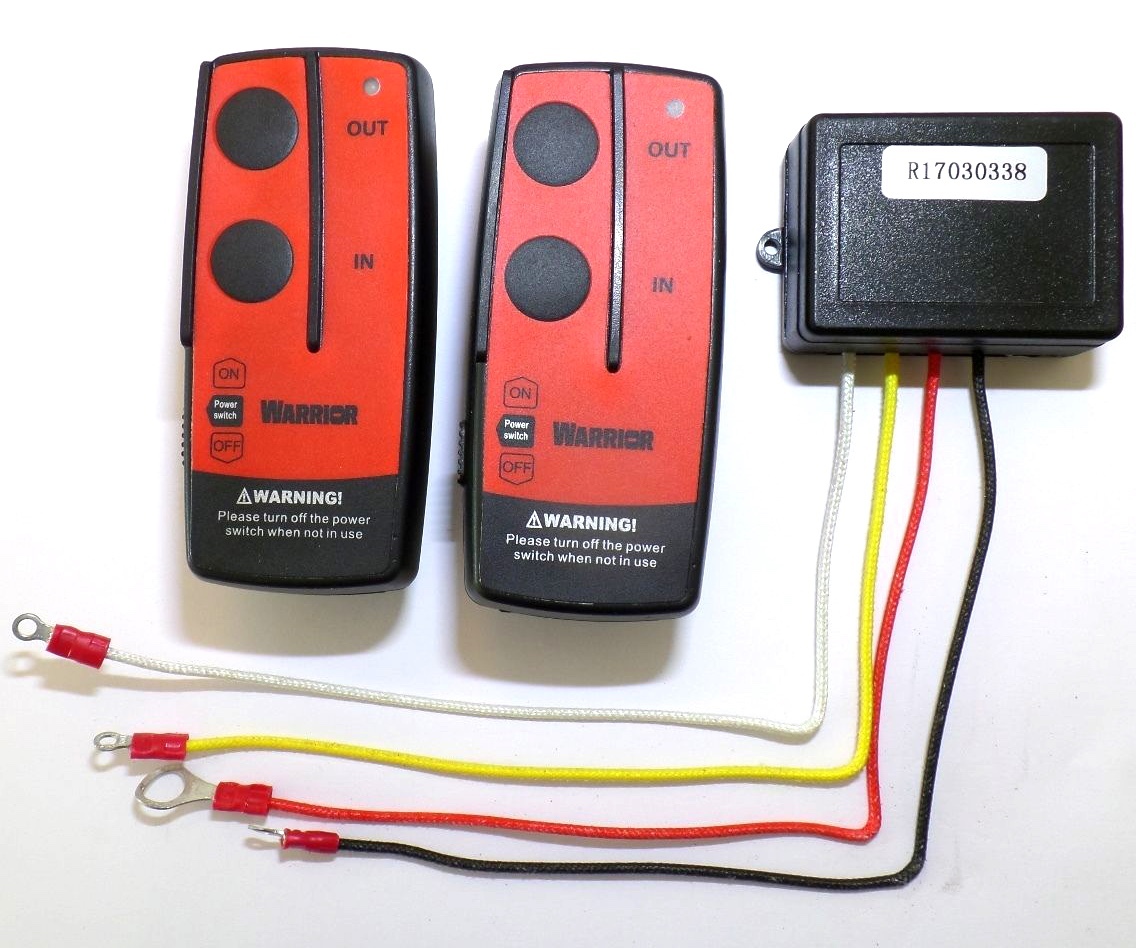
I have also purchased a Quick master switch for manual operations.
These all were placed together into the box and mounted just under the shelf internally. This seemed like a great spot as it was out of the way - accessable in an emergency and also very close to the windlass.
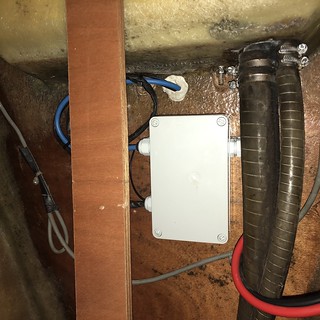
The cable hole is sealed with butyl tape, compressed into place - I did not want to use a permanent sealer on this as I intend to replace the shelf at some stage.
Fit a proper breaker.Finally once all the wiring and glass fibre repairs had been done, I needed to connect it all up to the battery bank. I decided to use the engine battery as I will always have the engine running when anchoring - and it's good practice to do this so that you run no chance of flattening your house bank with the windlass just as you switch off the engine.
I purchased a Blue Sea breaker and using a multi tool, cut a square hole in the nav station upper display area, this provided me with clean access to the cables coming down the side of the boat and also a direct run down to the battery. I then crimped on connecters to all the ends, added heat shrink and bolted it all together.

I still would like to fit a cube fuse to the battery, but the one I purchased was smaller in diameter than the Bavaria leads and would have led to a non satisfactory fit - so I in the short term have connected to the battery terminal using the theory that any short is more likely to be at the windlass end than the 500mm or so at the unprotected battery end, however I WILL be adding a fuse to this as soon as I can find something suitable to piggyback the Bavaria battery terminal.
Summing up.Overall, so far I am happy. The Quick 2000 windlass is suprisingly quiet and the remote control activation is instant, the last set I bought had a half second delay and I suspect that by wiring in the solenoid and remote so close to the windlass - I have removed the lag. The Quick manual switch does the job (I mounted that to the port side of the chain locker shelf again).
One small panic I had was when testing, I let the chain down and on reversing the windlass - the clutch span and nothing happened. I had visions of trying to explain to my wife why a perfectly good windlass wasn't man enough to haul our anchor chain up when I relaised that I needed to tighten up the gipsy - once done, normal service resumed and all was well!
The remotes work as far back as the helm position - with some judicial waggling in the air and become most effective around the companionway area. Having a pair means that come the inevitable day when my teenager chucks one overboard - I have a backup plan.

